Bikram Yoga Classes in Jersey

Please share if you like this site

  • Home
  • About
    • About Bikram Choudhury and his Yoga Method
    • About the Teacher
  • First timers
  • Classes
  • Blog
  • Yoga Wear

Posture #10 – Standing Separate Leg Head to Knee

July 20, 2015 By Beverley Brown Leave a Comment

So now that we have mastered the Master Posture (the Triangle) and its “opening” abilities we will proceed to do the opposite and effect a compression posture.  It is this opening and then ,compressing that brings the body back into balance.  This posture is in fact a mix of the Balancing Stick and Rabbit posture.

Standing separate leg head to knee pose

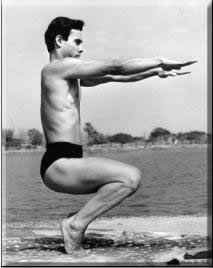
Standing Separate Leg Head to Knee Posture

This posture looks simple enough – it is a very common posture that I personally used to practice many moons ago with my normal hatha yoga practice – isn’t it? Well, not quite!  In the Bikram series there is a “minor” adjustment which is making sure the forehead touches the knee ensuring that the internal organs get the proper compression.  In many other forms of yoga this posture is used more as a stretch as the head is allowed to go further down the leg.  That is still a great posture but has a different effect on the body.

To start, bring your arms up over the head and keeping your palms together cross the thumbs to keep them in place.   As usual, stretch up to the ceiling and keep your elbows locked.  The head stays glued in between the arms just like you do in Half Moon and other postures.  That is the great thing about Bikram Yoga –  the style of the postures is consistent and therefore once you get the hang of it, it all becomes second nature!

This time take a 3 foot step to the right so you end up with a slightly narrower stance than the last two postures.  Turning the right foot to the right, you twist the hips a few times as necessary to make sure the hips are “square on” and you are facing the side wall directly.  Make sure your heels are in the same line.  The back foot should be flat on the floor and turned to a 45 degree angle as this stimulates the kidneys.

Now the arms and head have to go down together so you need to exhale to do that.  With the chin tucked right down to the chest this will work on your thyroid and parathyroid glands i.e. your metabolism.  Where your eyes go your body goes so as the intention of this posture is to  compress your inner organs you need to look up at your stomach and place the forehead on the knee or even higher (if your really game) but definitely not below the knee.  Touching the forehead with straight legs can be a challenge for a lot of people so keep your leg straight as you go down and then you can bend the front knee or make a wider stance if necessary to enable that bit of ingenuity!  The pressure on the forehead is the main point of this posture and can be achieved even if you have to bend your front knee “big time” to do it so even first timers can get maximum 100% efficiency in the posture.   As with all yoga the point of the posture is what it is doing for your body whilst in the posture not the appearance of it even though that will improve as the body gets used to the positions you put it in!

Once you’ve got that forehead to the knee it’s time to start sliding your fingers forward away from the toes so that your elbows lock and the wrists are straight.  Then by pushing your hands against the floor you can try and get your knee locked with your “smiling happy face” as Bikram would say!  Exhale as you suck your stomach in.  Now this does not feel comfortable sometimes as the throat feels like it is choking but your breathing is “normal” meaning you don’t hold the breath.  Bring maximum weight on to the front leg and stick that hip up towards the ceiling as you will find this one likes to slip below the other one and you need to have both hips level so you get maximum compression.   The last adjustment is to lock the knee a couple of times very quickly before inhaling with full lungs and gently coming back up keeping your arms and head together.  Stop in the middle before rinsing and repeating on the other side.

To finish bring your arms down and bring the feet together – ahh bliss!

Summary of the main points:

  • Arms and head together with the palms glued together
  • Step 3 feet with the right foot
  • Keep the heels in the same line
  • Back foot should be flat on the floor i.e. even the heel and turned to a 45 degree angle
  • Twist your hips about 5 times until they are “square on” the side wall
  • Exhale and suck the stomach in
  • Place your forehead on the knee even if you have to bend the knee to get it there
  • Eyes open look up to the stomach to give greater compression
  • Lock your elbows, wrists straight as you slide the baby fingers away from the toes
  • Lift your front leg hip up to the ceiling to give the correct compression
  • Try and lock the front knee just before the end if not already locked

Summary of main benefits:

  • Marriage between the pancreas and kidneys, thyroid and pituitary glands
  • Extension of the oblongata and medulla – good for eyesight
  • Opening the throat and crown chakras – alleviates depression
  • Good for the digestive and endocrine systems, metabolism, body chemistry, immune system.
  • Compression of the pancreas, extension of the kidneys.
  • Slims and tightens abdomen, waist, hip, buttocks and upper thighs.
  • Tones arms when your arms are locked

See you next posture!

Bevx

Filed Under: General, News, Posture tips Tagged With: balancing stick posture, Bikram Yoga, depression, eyesight, postures, rabbit posture, slimming and toning, standing postures, standing separate leg head to knee

Posture #9 – Triangle

July 1, 2015 By Beverley Brown Leave a Comment

Bikram Yoga Triangle PoseSo now we get to the  Triangle Posture which is often known as the Master Posture in the Bikram Yoga Series.  This powerful posture works every muscle, joint, organ, tendon, ligament, and major gland of your body!  It is towards the end of the Standing Series and everything you have done up to now has prepared you for it.

It’s an “opening” posture – it’s going to open up the chest and of course the hips and other major joints.  I always think of it as a “heaven and earth” posture as your top half should be reaching for the stars while from the hips down you should be glued to the floor.

I always believe if you set your posture up before you start you will find a lot more strength and energy available to you and soon it will just feel “right”.  So here goes:

How to get the best out of the Triangle

This is a bigggg posture so you need to take a bigggg step to the right – at least 4 feet minimum while your arms raise over your head.  Now to balance that bring your arms down parallel to the floor.  This will open up the chest and give you more “puff” to hold the posture!  The stronger you can hold your arms the better or course and as always fingers and thumbs together and palms are down.  The added benefit to this is super toned arms as a result!

Focus in the mirror as this always gives you much more strength and before moving anything else open the hips up by pushing them forward and lean your upper body back (opens the chest).  From there turn your right foot all the way to the right.  Bikram always used to tell us to turn it “1/2 inch more” to make sure it is exactly parallel to the mirror or  wall  in front of you.  The heels should also be in one line as if you could draw a straight pencil line behind them.  These seemingly minute details will assist greatly with your alignment.  I’m a bit of a stickler for alignment as a sloppy set up completely messes with the integrity of the posture and is just plain uncomfortable for the student!  Once that “muscle memory” is there it will be easier from then on so it is really worth the work at the beginning.

Bending the knee is next (while your spine is straight) and trying to get the leg in that famous “upside down L shape” is the next challenge – again the posture will feel easier quicker if you can give attention to that.  The ankle and knee should be in line with each other to prevent any stress on the knee.  This is also where you try and keep those pesky hips down as they have a sneaky tendency to try and rise up at this point.

Keeping your hips forward and arms and body back so your chest is open and the spine is straight like a candle down the centre, inhale and as if a broom handle move both arms at the same time.  The right hand fingers should be placed between the big toe and second toe – the elbow being a the same level as the knee, taking care not to put any pressure or weight on the toes or the floor.  The weight should be on the bent leg instead.

Now it’s time for a bit of star gazing and eventually your chin will touch your shoulder.  At one time my chin was way off the shoulder – I could not understand how it would ever get there until one day it just did!  Sometimes the shifts can be very sudden so stay open to that possibility even if it seems a long way off today.

Taking a deep breath keep reaching for the moon and rolling the left hip forward push the other knee back with your elbow.   This ensures the joints are opening up and the alignment is kept.  Touch the toes!  The last part is a mini spine twist as you stretch up to the ceiling.

Ditto on the other side……

I know this posture sounds near on impossible but I have seen new students make incredibly fast progress if the set up is correct from the start.  Progress is made by “muscle memory” so may as well get that memory happening early on in the piece.   It truly amazes me every class and it is so rewarding to see.

Summary of the main points:

  • Step wide – at least 4 feet
  • Strong arms and open the chest as much as possible
  • Hips forward before turning the foot to the side
  • Try to keep the heels in one line and the foot turned “1/2 inch more” as detailed above
  • Bend the knee and aim for an upside down L shape
  • Take care that the knee is in line with the ankle
  • Try to move both arms at the same time as if they were a broom handle
  • Stretch up, stretch down – fingers between the big toe and second toe and the elbow in line with the knee
  • Try to keep the hips open and the bent knee back a little (without strain of course)
  • Touch the toes but with no weight on the toes or the floor
  • The spine twisting part at the end will ensure you reach for the stars!

The Benefits of Triangle pose

  • Works every muscle, organ, tendon, ligament, joint and major gland of the body – wow!
  • Strengthens and tones just about everything!
  • Opens up the chest
  • Great for posture
  • Tones the arms
  • Of course it works the spine – especially helpful for assisting with crooked spines and lumbago

Bevx

Filed Under: News, Posture tips Tagged With: Bikram Yoga, strengthening, toning, triangle pose, warrior pose

Tao Porchon-Lynch – 96 year old yoga teacher

June 26, 2015 By Beverley Brown Leave a Comment

If you have 15 minutes to spare this lady is very inspirational and talks a lot of truth!

Enjoy

Bevx

Filed Under: General, Newbies and nearly newbies, Posture tips Tagged With: 96 year old yoga teacher, age, ageing, India, mind, Tao Porchon-Lynch, universal energy, Yoga

Why Bikram Yoga is so Effective on the Body

May 30, 2015 By Beverley Brown Leave a Comment

Bikram Choudhury doing Bow Pulling PoseIf you have ever taken a Bikram Yoga class anywhere in the world you will notice that the teacher seems to a have a problem with verbal diarrhoea!  I had to laugh when a student (who is now an amazing teacher) likened it to a “rap” when he attended his first class with me!  Yes I agree when you are not used to it it can seem a bit intrusive but after this post you may think a bit differently.

There is a reason for everything in Bikram Yoga – e.g. the heat, the order of postures, the timing and definitely the detail and that is probably why it is the most comprehensive series of postures that work every inch of you – inside and out – from bones to skin – from the fingers to the toes – to quote the Founder himself!

Every posture comes with a detailed set of instructions.  Why is that so?  Partly to ensure the correct timing (those last few seconds are the most effective) but also because we can get very “creative” in adapting postures to suit ourselves and thereby avoiding the whole point of the posture!  I know I was guilty of this for years, like Eagle Pose for example, being told to suck in my stomach at the same time as twist myself into a pretzel was going a bit too far I thought!  Come on Bikram – really???  Yes really!

Awkward Pose – the same thing – when your legs feel like jelly and then you have to make sure your stance is an exact “H” not even a slight hint of a “V” in there – oh PLEEASSSEE!  (Don’t worry if you have never done Bikram Yoga before and you think I’m talking gobbeldy gook – come to class and all will be revealed!)

I found out many years later how incredible each line of the dialogue really is and that is why I decided to teach this yoga again.  I took a break for a while and concentrated more on shifting the limitations of my mind / consciousness, and then when Bikram Yoga “came” to me again I was able to see everything with a fresh perspective and definitely new awareness and understanding of the postures.  I was amazed that much of the information that I had learnt and the awarenesses that I had gained in later years from many, many other body/mind modalities (I was a workshop junkie!) was actually already included in this series of postures and I was inspired once again.

I truly believe the detail, the timing, the order and the precision of the postures is one of the biggest gifts of Bikram Yoga.  I have taught this Yoga to many students over the years in various places around the world and I see first hand the difference that the Bikram detail (once applied) makes in anyone’s yoga practice and body and it is simply amazing.

Of course I understand if you have some bodily or physical challenges there may be much you cannot do and that is OK!  Just do the postures to the best of your ability in that moment (and never forget that things can change in any moment too – never limit yourself with your thoughts).  Concentrate on what you can do and do not judge yourself for what you can’t do right now and you will still get 100% benefit.  That is why anyone can do Bikram Yoga.

Even if you have practiced for many years and are proficient in the postures, make the effort to “re-hear” the instruction and see for yourself how many “short cuts” you take in your practice – as I said – we can get very “creative”!

There are gems hidden in the detail I can assure you.

Bevx

Filed Under: Athletes and Sport, General, Newbies and nearly newbies, Posture tips Tagged With: Bikram Yoga, Bikram Yoga dialogue, dialogue, Heat, posture tips, postures, precision, verbal instruction

Posture #7 – Balancing Stick Pose

May 16, 2015 By Beverley Brown Leave a Comment

Balancing Stick PostureHere is the next in the series of Posture Tips – the powerful Balancing Stick Pose!

(10 seconds in this posture is reputedly to be the equivalent to 10 minutes on a treadmill – I know which I prefer!)

The last of the “three” balancing postures is a doozy!  This posture is only held for 10 seconds but can be a great workout for the whole of the body.  As with all Bikram postures I believe preparation and alignment is key to not only getting the best out of a posture but also making it more enjoyable.  Nothing feels great if you are just trying to hang in there and the body is all twisted so prepare first and you’ll find it really helps.  It’ll tone you up much more too!

This one takes your determination and focus as you are not really in a natural position for the body – standing on one leg and trying to keep the body and arms parallel to the floor is not something the body is accustomed to!  But it can be done!

Preparation for Balancing Stick Pose

Start as normal with your feet together and raise the arms up – hands just like in Half Moon Pose i.e. place the palms together right to the wrist, interlock the fingers and release the index finger and cross the thumbs.  This makes the body know you mean business!   Just like most the postures keep the head glued in between the arms and don’t let the two body parts separate.  Most beginners will try and keep their head up to see where they are going but when the head and arms are separated the energy is dissipated and you won’t feel as strong.  Keep the chin up so you can breathe and bring the body back a couple of inches – this will again open up the chest allowing you to have more puff for the posture!

As you inhale, take a big step forward on the right foot and then ensure both knees are locked.  I find if I point my left toes too it really allows the leg to be straight – both legs locked to begin with gives you a lot of “oomph” to do this posture.

Let’s go – 10 seconds only!

Then in one piece the whole body pivots like a see saw and then comes to a balance in the middle.  I often say to my students – imagine you are like a steel bar with no bends in the middle – that’s how much you need to keep straight so you don’t end up like the “broken umbrella” as Bikram so eloquently puts it!  Broken umbrellas – weak, steel bars – strong!  Imagine yourself in a T – parallel to the floor – you can feel it when you have it.

Keep those legs locked and toes pointed and you’re sorted!  The other challenging part is keeping the arms upright – mine tend to try and dive bomb a bit and your arms will pull you down if you let them.  So again it’s just practice to keep lifting them so they stay parallel to the floor.

While you are in this posture there is no let up – try to continuously stretch forward and backward as if someone is pulling your foot and another is pulling your arms – like a good ol’ tug-o-war! One  of Bikram’s favourite words for the arm part is “as if the scapula is coming out of the body”!  Body down  – leg up – every muscle contracted!

You will need to look forward but keep the head down securely cradled in between those lovely strong, locked arms!  Where your eyes go your body will follow – you want to go forward so look forward!

Once you start to improve on this posture after lots of practice you can start to fine tune – like rolling the hip of the airborne leg down a bit to ensure your hips are parallel to the floor.  Then you can gauge whether your legs or arms need to be higher or lower but all this comes in time and when you are ready to make some improvements.

At last the 10 seconds are over, inhale and come back to centre.  Rinse and repeat on the other side and then give the second set all your muster!  I feel worked out just by writing this!

Summary of the Main Points of Balancing Stick Pose

  • Keep the arms strong by locking them and glueing the palms together
  • Head is glued in between the arms throughout the posture
  • Body is back a little – open the chest to allow you to inhale properly
  • Keep the chin away from the chest so you can breathe
  • Pivot the whole of the body in one piece – don’t separate at the waist!
  • Eyes forward – look forward
  • Keep every muscle contracted for the whole posture, stretching forward and pointing toes
  • Aim to keep the arms and legs locked
  • Pull in the tummy – that will give you a lot of core strength to hold this posture more easily

The Benefits of Balancing Stick Pose

  • Opens up the chest and works the heart
  • Develops determination, focus and concentration
  • Increases body strength like nothing else!
  • Tones up every part of the body and it only takes 10 seconds – love it!

Next up is Standing Separate Leg Stretching – my favourite “feel good” posture!

Speak soon…

Beverley x


Filed Under: Athletes and Sport, News, Posture tips Tagged With: balancing stick, Bikram Yoga, cardio, strength, tone up

Why are my best Bikram Yoga classes when I’m tired?

May 7, 2015 By Beverley Brown Leave a Comment

I have noticed something time and time again.  Sometimes when so tired from being in an office all day and almost talking myself out of going to class I actually have the most amazing class and to top it all I am no longer tired afterwards!   Why is that?

Well yoga actually gives you energy instead of depleting you of it as it works from the inside out not the outside in.   The body actually has so much energy available that we are not even aware of and it is just waiting to be released.  You could look at the postures as a way to free up that energy.  As you allow the body to move and be held in certain positions “trapped energy” will be released and start to flow more.  After regular practice you may notice how life “flows” more when practicing yoga than when you don’t as the body is intrinsicly linked to all areas of your life.

By the way, you may wish to look at inflexibility as energy that has got stuck – once you move that body part a few times, blocked energy frees up and the body “becomes more flexible”.

When you’re tired you may just not “try so hard” but instead let go and allow the body to open up, allow energy to flow which will automatically bring more ease to the body.  For a long time I used to “fear” some postures as I found they hurt but after studying energy and many other modalities over the years I realise now that I was not willing to just let go – I was trying to control it so I would “get it right”.  So for me when I am tired I let go so much easier, I stop trying so hard and hey presto I have a great class and uncannily feel much stronger and have oodles of energy after class as an added bonus!

You may like to give it a go when you find yourself battling the excuse of being too tired to go to class.  You could be pleasantly surprised at the result!

Bevx

Filed Under: General, Newbies and nearly newbies, Posture tips Tagged With: energy, excuses, exhausted, flexibility, gain energy, inflexibility, letting go, relax, tired

Posture # 6 Standing Bow Pulling Pose

May 4, 2015 By Beverley Brown Leave a Comment


Bikram Choudhury doing Standing Bow Pulling Pose

Aah – a personal favourite!  Why?  Because I love the challenge of it!  Even after many years of practice I have to give this one my all! It is actually the posture that I used to get nervous about  –  mainly because I would get mad at myself if I couldn’t hold it.   As often is the case, I made peace with the posture and now I love it!

Thank goodness, I no longer get cross with myself if I have to come out or even if I fall out – I simply get back in and use the time I have.  Funnily enough, once you take the pressure off yourself of trying to hold it you usually can!  The first set is held for 1 minute and the second just 30 seconds.

Here is how it goes.  A summary is repeated at the bottom if you prefer.

Preparation for Standing Bow Pulling Pose

As this is the second in the group of 3 balancing postures, as usual you start with your feet facing straight forward and bring your right hand out, palm facing up. Thumbs and fingers together as Bikram says “as if you are holding money in your hand” and you don’t want to drop it!  Then you bend your right knee and grab the foot which is now behind you with your right hand from the inside at the ankle.  This may feel strange as usually this posture is practised by holding from the outside of the foot but with the Bikram method it is slightly different.  Make sure you have that nice tight grip and that you don’t lose it.  Then to stabilise yourself, the left arm goes up very close to the head.  Again fingers and thumbs together so your hand is kind of like a paddle and  your arm is locked and strong.

Focus and final preparation for Standing Bow Pulling Pose!

Now it’s time to get your focus by gazing at your standing knee  which as usual should be locked throughout the posture so you have that “concrete lamppost in place” true Bikram style!  Concentrate on that and it will give you a lot of strength.  Make sure your knees are together at the start and the hips will automatically be square on the mirror.  This will avoid doing the “surfing stance” which brings the body out of kilter before you start!

As you inhale, charge the body forward towards the mirror as if you are trying to touch it with your fingertips, and at the same time, kick your right leg back and up towards the ceiling.  You bring the body down from the lower spine until the chest and abdomen are parallel to the floor.  This is possible as you are constantly stretching your left arm towards the mirror and this will lead your body down.

As a beginner you may have a tendency to just try and “hang in there” for the duration of the posture (counting down the seconds no doubt) but as in all Bikram postures by being proactive with the instruction you will find it will make each posture easier not harder as you may think!  Every little detail helps to create more strength and eventually more ease.  In the old days there were some little details I would try and get away with not doing, only to find when I did make the effort to listen more and do what was in the dialogue that the posture became soooo much easier!  I was surprised but I have since found that to be true on all the postures now – it’s like one day there is an “aha moment” and your body just starts to get that feeling of “oooohhh – that’s what its meant to feel like!”   I have heard this from other students too so I know that this is quite a common occurrence.

So in the case of Standing Bow Pulling Pose it requires you to continuously kick your leg back and up as hard as possible and eventually your foot will be visible above your head “like a red indian feather sticking up!”  If it seems like you’ll never see that foot in the mirror – don’t despair just try moving the foot away from the buttocks first and then kick up. As usual there is always more to aim for (what’s new?) if you’re game and that is to get both feet in one line down the centre.

Keep on kicking back so eventually you can’t see your right shoulder in the mirror as it is behind the left shoulder and therefore invisible in the mirror.   Keep on stretching your left fingers towards the mirror and you will find you gain so much more poise and strength to enable you to hold longer.  The dialogue then says to try to touch your shoulder to your chin.  Now it doesn’t say try to touch your chin to your shoulder – why? Because if you move the direction of your head you will lose the balance and alignment.  The head should stay straight as “where your eyes go the body follows” and you will also lose your focus if you turn your head.  So you keep your head facing straight and bring the body parts in towards the centre.  The dialogue will keep you on track every time!  Eventually both shoulders will be in one line.

Kicking and stretching should be 50/50 – that ensures your balance and if your standing leg is locked too – those three things – as Bikram famously used to tell us ” You can balance there for EVVVEEEERR!”  I think that could be a tall order but you get the idea!  The rest of the posture is continually keeping the standing leg locked, stretching forward and kicking up until finally the 60 seconds is up – phew!   Then you have the pleasure of doing it all over again on the other side.

The second set of 30 seconds will feel like a doddle now !  Actually joking apart I usually see that the second set seems be so much easier for everyone and this is possibly due to mind over matter again – the extra seconds can play on the mind and you can put too much pressure on yourself.  If you’re the over achiever type of person it may be best to think “who cares?” and just go for it with a light hearted attitude – “bank” the seconds you hold the posture and ignore the rest.  If you come out or fall out don’t judge yourself (judgment does not help your body one iota), just use the time to go in again and practice.  Those three, four, seven, fifteen seconds will eventually merge into being able to hold for the whole time without the breaks if that is your aim of course!

Summary of the main points of Standing  Bow Pulling Pose:

  • Keep thumbs and fingers together with palm up to grab the foot from the inside at the ankle and hold that strong grip
  • Standing leg should have a locked knee and act as that “concrete lamppost”
  • At the start the other arm should be strong and upright very close to the head
  • Both knees together at the start facing the mirror to avoid the “surfing stance”
  • Inhale and charge the body forward until the chest and abdomen are parallel to the floor
  • Keep stretching the stabilising arm forward as if trying to touch the fingertips to the mirror
  • Keep the head straight and touch your shoulder to your chin (not the other way round!)
  • Continually keep kicking up and back with the leg until eventually you can see the foot raise up behind the head (this could take time – no worries!)
  • All three – stretching forward, kicking up and standing leg locked will enable you to keep the balance!

The main benefits of Standing Bow Pulling Pose:

  • Increases both strength and flexibility
  • Tones the legs and arms, lifts the buttocks
  • Develops concentration, focus and determination
  • Shunts blood from one side of the body to the other allowing it to equalize again when standing still in Savasana
  • Acts as an internal massage
  • Flushes blood to the face giving it a glow
  • Relieves back pain as it brings flexibility and strength to the lower spine
  • Works out most of the body’s muscles
  • Opens up the chest and increases lung capacity
  • Great for pregnant women
  • Flushes out the kidneys to eliminate toxins
  • Helps correct high blood pressure
  • Good for tennis elbow and frozen shoulder
  • Improves flexibility of the sciatic nerve
  • Strengthens and firms the abdominal wall, upper thighs, upper arms, hips and buttocks – great all over workout!

Well as usual I’ve gone on a bit!  Just take the bits you need!

Bev x


Filed Under: News, Posture tips Tagged With: all over workout, balance, Bikram Yoga, Bikram Yoga standing series, concentration, determination, flexibility, focus, massage, posture tips, pregnancy, Standing bow pulling pose, strength

Posture #5 – Standing Head to Knee Pose

April 21, 2015 By Beverley Brown Leave a Comment

Well as promised here are the tips to assist with Standing Head to Knee Pose.

For me, this posture is the first one of the major balancing postures – I feel it is part of a “group” together with the Standing Bow Pulling Pose and Balancing Stick.  These three postures will work you out physically but really allow and in fact demand from you an increase in concentration, focus and determination of the mind.  I really enjoy them actually as I like the challenge!

For beginners, this is likely to be the first posture where you really get to realise how important it is to lock the knee.  I have been told several ways to think about the locking of the knee – one was to “suck” the muscle to the thigh bone and pull up the knee cap. After a number of classes you begin to experience “muscle memory” and it will get to feel more like a normal action than it is when you first try it!  It will become second nature – eventually, I promise!

In order to write this post I have gone back to my original posture clinic notes and I came across this tip and for some, this may help.  Instead of concentrating on tensing and tightening the leg muscles, you may like to relax and bow the leg back instead.  I had completely forgotten about this until I read it this week!

I am a strong believer if you relax into the postures first instead of resisting them (and even trying too hard) you will greatly improve not only your yoga but it does wonders for your whole well-being too.  This is a part of big subject and something that I have been looking into over many years but it is interesting when I found this note as basically it is saying the same thing!  So if a locked knee is not yet your speciality you may like to change the focus and relax and bow the leg instead!

Kicking the leg out

When you start this posture you shift your weight slightly to the left leg and lift up the right foot.  You will need to interlace the fingers right to the webbing and ensure your thumbs are crossed underneath the foot so you get a good grip and able to keep it throughout the posture!  If you pull your stomach in as you do this, you will be stronger and it will also help your spine as it prevents backache.  The correct position to hold the foot is three inches below the toes.  

Now for the focus of the eyes, which if you have read any of my other posts, will absolutely make you stronger in any posture.  You don’t have to have your eyes bulging out of their sockets, just a gaze at your left knee in the mirror will work wonders!

Now before you go any further in the posture you must ensure your left knee is locked.  I find it helpful if you imagine your leg going down into the ground just like the infamous “Bikram speak” “concrete lamp post”- unbroken – no knee!!  If your knee is not locked do not kick out, just stay there in that position until you gain strength as you do not want to put pressure on a bent knee.

Now it’s time to inhale and slowly kick your right foot towards the mirror until the leg is parallel to the floor – no higher – no lower – at the same time maintaining the lock on the left knee!  WHAT?? you say – yes ‘fraid so – but one day muscle memory will kick in and you will!

Taking another deep breath, continually kick the foot away from you towards the mirror.  Another tip I just got reminded of was instead of focussing on straightening the raised leg, change the focus to pulling the toes back towards you and pushing the heel towards the mirror.  Sometimes just looking at something differently can produce a better result so you can try it!  Don’t forget that pesky left knee to stay locked.  While you are in this stage, open the chest – whenever you do this you will have more energy to hold the posture.

If you fall out even after a few seconds, “bank” that success, and go back in.  Use the whole minute even if you drop out of it several times.  Do not judge yourself but just regain your gaze, and as they say in the UK – keep calm and carry on!  Eventually all the seconds in the posture will add up to the minute or half minute depending which set you are on.

The Next Stage – Elbows Down

The aim is to eventually get both legs locked and looking like an upside down “L” shape and only then it is time to pull your stomach in (if it isn’t already) and bring the elbows down by the side of the calf muscles and eventually they will go down below the calf.  The arms get nicely toned at this point!

The Finale – Head to the Knee!

Head to the knee is the ultimate aim but you only go for this if you have both legs locked.   In order to do this you need to change your gaze to your standing big toe, tuck the chin right in so you compress and then your head has a chance of landing on the knee.  If your head is below the knee you will not get the compression that the posture is aiming for.

If you are not ready to attempt the final advanced adjustment – no worries.  It may take a while.  When you feel comfortable enough with your balance you may wish to give it a go.  Step by step is the Bikram way for all these postures.

Then you get to repeat the whole process on the other leg!  The first set is held for a minute on each side and the second one is an easier 30 seconds only.  Try not to think about the time while you are in the posture just keep your attention on the adjustments and the seconds will be over before you know it!  I have found it is always easier to be “pro-active” in the posture rather than just hang in there waiting for it to be over!  You will improve much faster this way too.

Summary of the Main Points

  • Focus your eyes on your left knee in the mirror to get your balance and strength
  • Make sure you have the proper grip of the foot by interlacing fingers right to the webbing and crossing the thumbs under the foot – this will keep the grip in place
  • Only kick out with the other leg if your standing knee is locked
  • Pull in the stomach muscles throughout the posture as it makes you stronger and works the internal organs
  • Inhale when you raise the leg and concentrate on kicking the heel towards the mirror and toes back towards your face
  • Keep the standing knee locked throughout the posture
  • Open the chest until you bring your elbows down
  • Only if both legs are locked bring the elbows down towards and then below the calf muscles
  • Only attempt the head to the knee if both legs are locked out
  • Change your gaze to your big toe on the ground
  • Tuck in the chest and slowly bring the head to the knee!  Voila!

The Benefits of Standing Head to Knee Pose

  • Develops amazing concentration, focus, patience and determination
  • Works the nervous system and the mind
  • Compresses the internal organs to enable them to function properly
  • Slims and tones the legs like nobody’s business!
  • Uplifts the buttocks
  • Great for the abdominals when the stomach is sucked in
  • Works all the muscles in the legs, arms, and back
  • Strengthens the spine

Next one in the Posture Series is the Standing Bow Pulling Pose.  I will post some other posts in the next couple of days too.

Enjoy!

Bevx

Filed Under: Newbies and nearly newbies, News, Posture tips Tagged With: Bikram Yoga, concentration, determination, focus, mind, slim legs, standing head to knee, standing head to knee posture, standing series, uplift buttocks

Posture No 4 – Eagle Pose

April 14, 2015 By Beverley Brown Leave a Comment

Eagle Pose - Bikram Yoga

Well after a couple of strengthening postures it’s now time to get some flexibility into the joints of the body and you can be rest assured that the shoulders, elbows, wrists, hips, knees and ankles will all benefit from the Eagle Pose.  And of course because it is the start of a few balancing postures it’s great for your focus and centering of the mind.  In fact in order to balance you will need to have your mind focussed!  The easiest way for me is to gaze at one spot in the mirror and hold it there.  This I find gives me so much more strength and determination than if I look at different things and let my mind wander.

The Arms

You start off the posture as normal with your feet together and then give your arms a big swing out sideways to get the momentum to be able to cross them.  If you’ve given your arms a big swing you should be able to cross your elbows. If possible bring your palms together (if not – no worries – just interlace your fingers for now). The thumbs stay uncrossed but they should be facing you and the pinkie fingers will be nearest to the mirror.  Then make sure you pull the hands down so the fingertips are below the nose.  This Bikram adjustment differs to most methods of yoga but it will make sure that the heart is being worked.  Again as always if you cannot get into the whole posture just do the best you can!

The Legs

Now to get the leg wrapped around the other, bend your knees and keep your back straight.  The dialogue says to sit down as if your hips are touching the chair.   If you lean forward you will find it much more difficult to wrap the leg around as you’ve made a bigger distance to cover.   The easiest and best way is to keep straight but just bend the knees, then lift the leg as high as possible.  This will definitely make it easier to wrap your leg around the standing leg.

Naturally everybody is different and for some students it may seem impossible to be able to do this but just know and be willing that shifts in the body can happen at any time so don’t write it off as impossible – I have seen many miracles with this yoga!  If you give your 100% effort you will get 100% benefit no matter whether you are in the full position or not.

By the way as this is a left and right brain exercise ( a bit like Brain Gym!) if your right arm is under, your right leg is over and vice versa.  

Once in position there’s still stuff to work on – it is Bikram’s after all!  Squeeze your legs together as if like ropes – this will also do wonders for the inner thighs!   If you can, try and get the foot underneath the left calf muscle by sliding it down towards the ankle so there is no gap between them and eventually you will see your toes in the mirror!

By now it’s also time to try and straighten the spine by pushing it back (just like in Awkward Pose). Then as if you haven’t got enough to concentrate on,  bring your knees to the right and upper body to the left just enough for you to align the body so that all the joints  e.g. feet, knees, elbows and hands are in one line down the centre.

If you find that the foot is slipping out just bend the knees more and sit down lower and by leaning back a bit more you will be able to hold the balance.  To top it off you suck in your stomach just like in almost all of the Bikram postures.  Believe me, when I was told to pull in my stomach as well as everything else, I have to admit I was saying a few naughty words under my breath!  However now I know that this adjustment alone has an amazing effect on the body, the mind, and the posture.  To finish, pull the elbows down more (works the heart) and give that spine one last lean back towards the end.

Then you have the same pleasure to repeat on the other side!

A summary of the main points are:

  • Keep your eyes focussed on one spot on the mirror in order to balance
  • Give a big arm swing and aim for palms together if you can
  • Bring the elbows down the front of the body so that the fingertips are below the nose (works the heart)
  • Bend the knees but don’t lean forward in order to get the leg wrapped round
  • Aim for no gap between the ankle and calf muscle by sliding the foot down towards the ankle to get it below the calf muscle
  • Squeeze those legs together and twist them like ropes – great for the inner thighs!
  • Adjust your legs and body so all the joints are in one line down the centre of the body
  • Sit further down with a straight back to keep the leg and foot wrapped around
  • Straighten your spine and lean back a bit to keep the balance
  • Pull the elbows down one more time at the end

Phew!

The benefits of Eagle Pose are:

  • Creates flexibility in all the joints of the body – shoulders, elbows, wrists, hips, knees, ankles
  • Fresh blood goes to the sexual organs and kidneys increasing sexual power and control
  • Firms the limbs
  • Great for getting a stretch to the upper back, neck and shoulders to relieve tension
  • Flattens the stomach if you pull it in during the posture
  • You can get away with doing this posture at work!
  • Centres and focusses the mind

Next up is Standing Head to Knee in a few days or so….Beverley

Filed Under: Posture tips Tagged With: balance, eagle pose, eagle posture, firming, great abs, heart, inner thighs, slim legs, slimming, toned arms, toned legs

Posture No 3 – Awkward pose…. Awkward as…..

April 7, 2015 By Beverley Brown Leave a Comment

Bikram Choudhury in Awkward PoseIf you have ever attended a Bikram class you will be aware that every posture comes with a full set of “instructions” in order to place the parts of the body in the optimal position.  No less with the Awkward Pose!

When doing this pose you will probably feel what it is doing to the legs but be aware it is also working big time on the arms, spine and the heart and a lot of internal areas as is normal for any posture.  By the way it works a treat on breaking down cellulite and toning up those thighs like nothing else does!  So I will include a few of the details that help you get the best out of this posture.

First part:

Firstly the feet should be 6 inches apart with the feet going straight out in front of you – like a perfect letter “H”. If you have the feet in a slight “V” shape (five to one on a clock face) you have already changed the dynamics of the posture.  You shouldn’t even be able to see the heels in the mirror – glue your feet to the floor at this stage!

Bringing the arms up will obviously be working on the heart and it is important to really stretch the arms out right to the fingertips as if you are trying to touch the mirror.  This will also ensure you are strong in the posture, great for your balance and tones the arms up like billy-oh too. “Nothing loose, nothing hanging” – as it says in the dialogue!

Exhale the breath as you need now to suck the stomach in and hold it in.  This area of the body will also give you a lot of strength when pulled in and it also has a positive effect on your organs and even your emotions – if you just let your stomach flop the posture will feel harder to achieve, you’ll just be hanging in there and wasting effort.

Now it is time to sit down until the “hips touch the chair”, spine as straight as possible and with the maximum weight on the heels.  This will assist with straightening the spine ( just like in Half Moon).  The focus should be on pushing the spine backwards.  Remember to keep pulling in that stomach until you can see your rib cage in the mirror.

By this time those pesky knees may have tried to find each other and meet up somewhere in the middle so its time to check that and ensure there is still six inches between them, also the toes (no “V” happening!), heels and even your hands.  Chest up, chin up – so you can breathe and you will feel stronger.  All the time you are trying to lean back to the back wall – almost trying to fall down backwards!

Inhale breathing and come up.

Keep your arms where they are.

Second part:

I make sure my eyes are focussed throughout this posture as I find it really increases my strength and stamina but in this part of the posture it is imperative and hence it is in the dialogue.  “Concentrate and meditate”.

Stand up on the toes as high as you can, making sure you have your concentration and focus on one spot in the mirror.  Now stretch everything up to ceiling – your spine, chest and head, upper body before slowly sitting down but this time with the weight on top of the toes with the spine straight.  Throughout this part it should feel like your hips and back of the head are touching the wall – “Bikram speak” for “straight”!

This time though, you sit down halfway until the hips touch the chair but not too low.   Then it is time to lift the knees up, lift the chest (gives you a lot more strength), lean back to straighten the spine again.  Come up higher on the toes (i.e. lift the heels up more) and continually lift the knees. Make sure that the hips have not sunk too low – they must stay at the height of the imaginary chair and not be lower than the knees.

Inhale as you come out, keeping your arms in the same position, flattening the feet for a second or two – phew!

Third part:

This time you come up a little bit on the toes and now you can do what you have probably wanted to do all along and bring the knees together! Squeezing those knees together will tone up those inner thighs as an added bonus.  Exhale as you suck the stomach in and keep your spine straight as you go down as slow as possible, taking at least 10 counts – ( I know – tell me about it! ) – all the time as if you are leaning against a wall.

Continually stretch your spine to the ceiling until you have 1/2 inch between the hips and heels.  At this point take care not the sink on to the heels, you do this by keeping your knees together and pointing them slightly down towards the mirror.  By this time your arms, and legs will be parallel to the floor and the spine straight in a 90 degree angle, as if you are like a three sided box.

To come up in control take a deep breath and keeping the knees glued together come up with your spine straight trying not to lean forward.   Always move slowly – there is power in slow movement.

On the second set if you have good knees you can do the famous Bikram motorbike riding to make sure you have control – but do NOT do this if you do not have strong knees – always take care of the knees!

As usual, ensure your shoulders are relaxed throughout the posture – there is no need to create tension where you do not need it!

Summary of the main practice points:

  • Keep the feet glued to floor once they are there and make sure they stay like an “H” – not “V’
  • Keep your focus by gazing at one spot in the mirror
  • Suck the stomach in
  • Try to touch the fingertips to the mirror – i.e. straight arms – nothing loose, nothing hanging, contract the arm muscles
  • Open the chest to gain more strength and stamina
  • Try to straighten up the spine as much as possible
  • Do not let the hips sink down lower than the knees
  • Keep the correct position of the knees depending on which part of the posture you are in

With every posture there are benefits on many levels – the main ones for Awkward Pose are:

  • Stimulates the internal organs for correct functioning
  • Tones and strengthens the arms
  • Tones and strengthens the legs
  • Works on the heart
  • Assists with straightening out the toes
  • Breaks down cellulite – bonus!
  • Great for your abdominal muscles
  • Gives lovely muscle definition on the thighs
  • Strengthens and aligns the spine

Filed Under: Posture tips Tagged With: awkward pose, Bikram Yoga, heart, posture, posture hints, posture tips, slim legs, spine, tone legs

  • 1
  • 2
  • Next Page »

Yoga leggings, other leggings and capris are now available in the shop

image of surf's up yoga leggings
Over 80 different Yoga Leggings designs are now available in several sizes. They can also be purchased in a plainer style in both long and capri lengths. These can be used for yoga and also as a welcome addition to any wardrobe! Click here to go to the shop and browse the many designs available.

Basic information for first timers

Welcome to Bikram Yoga!
If you have never attended a Bikram class before there may be a few things that you need to know. Bring a mat and a towel to put on top of it. If you wish to shower on site you will need another towel for that. Make sure you drink lots of water throughout the day as you will sweat. Also do not eat anything for about 3 hours before class. Wear something you can stretch in and nothing too baggy or it will feel hotter. We don't drink water until after Eagle Pose - not too long to wait and remember you can drink before class starts! Take it easy on your first class - just get used to the heat and the environment. Smile and come back next time!

Recent Posts

  • Yoga Planners and Journals
  • Teaching Bikram’s again and loving it! Barefoot Bodeez Vinyasa classes also available
  • The Simply Divine Way to Create Your Ideal Body – new Ebook available on Amazon
  • Posture #10 – Standing Separate Leg Head to Knee
  • Posture #9 – Triangle

Archives

  • October 2019
  • January 2017
  • June 2016
  • July 2015
  • June 2015
  • May 2015
  • April 2015
  • March 2015

Yoga Leggings and Capris are available in my online shop

image of surf's up yoga leggings
Over 80 different Yoga Leggings designs are now available in several sizes. They can also be purchased in a plainer style in both long and capri lengths. These can be used for yoga and also as a welcome addition to any wardrobe! Click here to go to the shop and browse the many designs available.

Please follow & like us :)

RSS
Follow by Email
Facebook
Facebook
  • Home
  • About
  • First timers
  • Classes
  • Blog
  • Yoga Wear

Copyright © 2025 Website designed by Beverley Brown